Saturday, April 2, 2022

Simply Earresistible


Hello again my friends. Jackie here with another card that is simply earresistible! I can't get enough of this bunnies. It's perfect for Easter cards, but can easily be colored up for cards of any occasion. Don't you think this would be a great Thinking of You card?


To make this card, I started off by stamping the flower bunny of the Hip Hop Bunnies stamp set, with Eclipse Black Ink on white cardstock. I used my Smoosher Tool to make sure I got a good impression. I then grabbed my favorite medium, Copic alcohol markers to color it up. I used W0, W1, W3 for fur, RV13, Y13, and Y38 for the flower. Y03, YG17, and YG67 for the leaves and R00 and R20 for the ears and cheeks.


Fussy cutting is easy, but nothing beats the smooth cut lines you get from the Scan n Cut machine. I've used my mat so much now that it's not even sticky anymore. But it's not a problem. I just use a little washi tape to adhere the paper down.


  I thought it would be fun to make the colored stripes instead of using colored cardstock, It's super easy to do. I just grabbed some scrap white paper and ran my Bubblegum ink pad across it. At first it looked really splotchy, but once it dried the color evened out. I did this again with Neon Lights and green. I then cut the stripes down to random widths and glued them to an A2 size Perfect Base Card Base.


I used my Misti again to stamp the sentiment, Simply Earresitible in Eclipse Black ink. I then grabbed my Crafter Magic Wand and Acid Wash Crown Jewels to add a little bling.


I had a few die cut leaves left over from another project. I glued those down, added dimensional tape to the back of the bunny and placed it over the leaves.  


Friday, March 18, 2022

It's Finally Spring

 Aren't these bunnies just the absolute cutest thing? I thought they were the perfect size for these little notecards. I made a set of six , thinking I may give them as a little gift, or maybe I'll just keep them for myself and have on hand for baby gifts.

           Today, I'm going to be using products from the Maker Forte Spring has Sprung Release 


To make these, I started by using the new Simply Saying Die to cut out the black and white sentiments sheets from the Simple Sayings - Spring Celebration. This die makes it so much easier. No measuring required.

For these cards, I decided to use the Welcome Baby, It's Finally Spring, and Welcome Little One. But I could have easily made these Easter or Mother's Day.

Using my Misti, I stamped two of bunnies from the Hip Hop Bunnies stamp set using Eclipse Black. I then turned the paper and stamped them again. I did this twice, but only ended up using 6 of the images


Now it was time to color these cuties. I really wanted each of them to be slightly different. The Copic marker colors that I used for the bunnies was T1, T3, T5, E41, E42, E43, C1, C3, C5, W1, W3, and W5. For the ears, I used R00 and R20. The flowers were colored using RV10, RV13, and RV14. Y15, Y17, and Y38. Y13, RV10, RV13 and Y15. All the leaves were colored with YG03, YG17, and YG67. The bandanas used many of the same colors Y13, Y15, and Y17. B00, B02, and B04. RV10, RV21, and RV13.

The dots on the bandana and the longer leaves stamped in solid black. I thought it would be fun to add a little more color, so I used a very small paint brush and Iuile color shift watercolor paint.


I used my Brother Scan and Cut to cut all these bunnies. So much fast that trying to fussy cut. To make the notecards I used The Greetery Crimped Notecard die in Welsh Dragon, Bubble Gum, and Yellowstone solid core cardstock and Neenah white cardstock

Now I am ready to assemble. I added dimension foam tape to the back of all the bunnies and to the sentiments as well. I placed the cut out bunnies just where their ears went over the top of the card and centered the sentiments below that.


Thank you for following along.

Happy Spring!

Until next time my friends - ❤ Jackie

FB/IG/YouTube


Saturday, March 12, 2022

St. Patricks Day cards

 I had so much fun creating the rainbow background. I started by lightly inking up the top portion of the stamp with Bubblegum ink. Then I blotted the edge with my blending brush. This helps keep a nice faded transition between the colors. Next I used California Love ink. I didn't clean the stamp off so mixing the pink and yellow gave me the orange shade. I followed up with Palm Tree, then Neon Lights and finally with Coronation Purple. Making sure to run the blender brush between each of the colors for a smooth edge

For the next card, I stamped Palm Tree ink on a piece of acetate. Spritzed it with water and the smooshed the ink onto a watercolor paper panel. Since I have no patience at all, I decided to quickly dry the panel using my heat gun. Once it was dry, I placed it in my Misti positioning tool. I used the same Palm Tree ink to stamp the St. Patrick's Day Background Stamp. I had to stamp it a couple times to get a good impression since the watercolor paper has a little bit of texture.


I stamped the sentiments panel using Eclipse Black ink on white cardstock. I brushed the panel with an anti-static tool and stamped it again with Clear Embossing ink. I think heat set with clear embossing powder.

To finish off the cards, I cut both inked panels down to 4 x 5¼ inches, and then glued those to Solid Core Eclipse Black cardstock cut to 4¼ x 5½in. I like the way the black frames the colored panels. Then I cut the sentiments into small strips. For the rainbow card, I chose 3 sentiments, Lucky as a Leprechauns, Pinch Me, and Follow the Rainbow. I added strips of foam tape and placed them on the card. And for the green card, I picked Happy St. Paddy's Day. I glued it to a strip of gold glitter cardstock and attached that to the card.

Watch the video to see me make these cards from start to finish.

Hope you find your gold at the end of the rainbow


Until next time - Jackie ❤


Thursday, March 10, 2022

Prayers for the people of the Ukraine


 - ❤ Jackie

Spread your Wings

 The first part of March is perfect time to work in my garden. So this last this weekend, I went to the nursery to replace all my plants that I’d lost over the winter. I especially wanted to rebuild and expand my butterfly garden. Something about seeing the colorful butterflies flittering around really changes my mood.

So I’m here today with this slimline card featuring Build A Butterfly Add On stamp set. I stamped the butterflies three times using Eclipse Black ink. I then grabbed an assortment of Copic markers in rainbow of colors. It took quite a bit of blending to get the rainbow affect, but so worth the time.


For the background, I grabbed an array of Tim Holtz Alcohol Ink and created another rainbow of color on Yupo paper. The colors are so much more vibrant with the Eclipse Black cardstock. After prepping my card stock with a anti-static tool, I stamped the sentiment using Clear Color Hive ink and heat set white embossing powder.

To assemble the card, I glued the yupo paper to Ultra White Heavy Weight Slimlime Card Base and then the Eclipse black die cut cardstock on top of that. I added dimensional foam tape to the multicolored butterfly and adhered the solid butterflies directly to the card.

I hope you like my card. Can’t wait to have some of these butterflies in my garden

Until next time – ❤Jackie

Tuesday, February 8, 2022

Let's Party

Let’s Party Birthday Card 

Hello again crafty friends. I don’t know about you, but my birthday card stash was seriously depleted last year. Since I couldn’t celebrate with family and friends, I sent them hugs via snail mail.

Today I’m using some of the items in the New Celebrations release . I started out by removing the foam pad in my Misti, treating the panel with an anti-static tool and then stamping Shower of Gifts with Clear Color Hive ink. I then generously sprinkled white embossing powder over the stamped image and shook off the excess. I heat set the powder until it was melted and shiny.

I grabbed a rainbow of inks. Because, well, rainbows make everyone happy. I lightly ink blended with BubblegumCalifornia LovePalm TreeNeon Lights, and Coronation Purple. I absolutely, love watching the image emerge against the background.

I cut down the panel to an A2 size, 4¼ x 5½. Then I cut a small strip of vellum about 1¼ x 6, and wrapped it around the panel and taped it down. I then adhered the panel down to the A2 Top Fold Pre-Cut Card Base.

The new Simple Saying – Lets Get This Party Started has so many fun sentiments. They’re printed on thick 110lb cardstock and are foil transfer ready. I choose Let’s Party from the set. I wanted to keep it simple so I just cut it out and framed with black cardstock so it would pop off the page.

In no time at all this card was done and ready for the mail. 

Until next time my friends – ❤️ Jackie 

Saturday, January 29, 2022

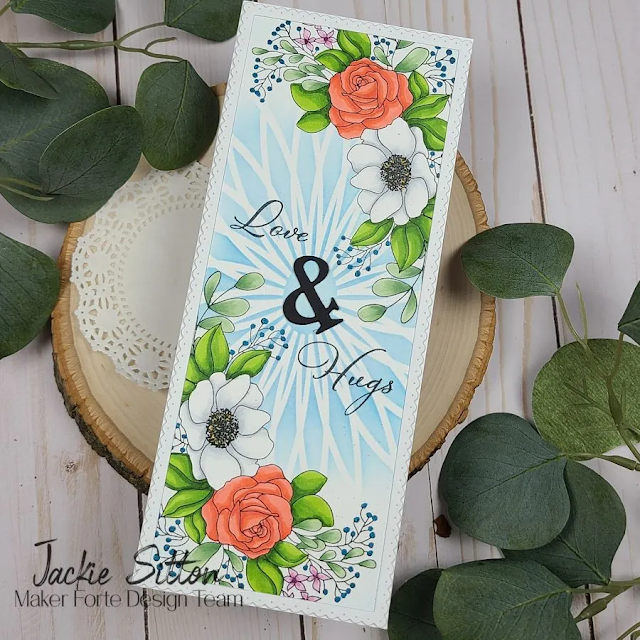
Love & Hugs


Hello and happy Friday friends. Jackie here and I’m excited to show you this slimline card I made using Hugs stamp set.

I started out by cutting down a sheet of Hammermill cover paper to 3½ x 8½. I wanted the stamp image to hang off the edge a little, so I used my Misti and inked up the flowers with Color Hive Remarkable Ink Pad in black Then I flipped the panel and stamped it again. If the paper hangs off the edge of the Misti a bit, it’s okay, it’ll still stamp perfectly

I knew that I wanted to add some color with a stencil, so while the stamp was still in my Misti, I stamped the flowers two more times on full stick Post-It note sheets. I fussy cut them out and carefully placed them over the flowers.

I then taped down the Glass Ceiling stencil and very carefully ink blended using Neon Lights.

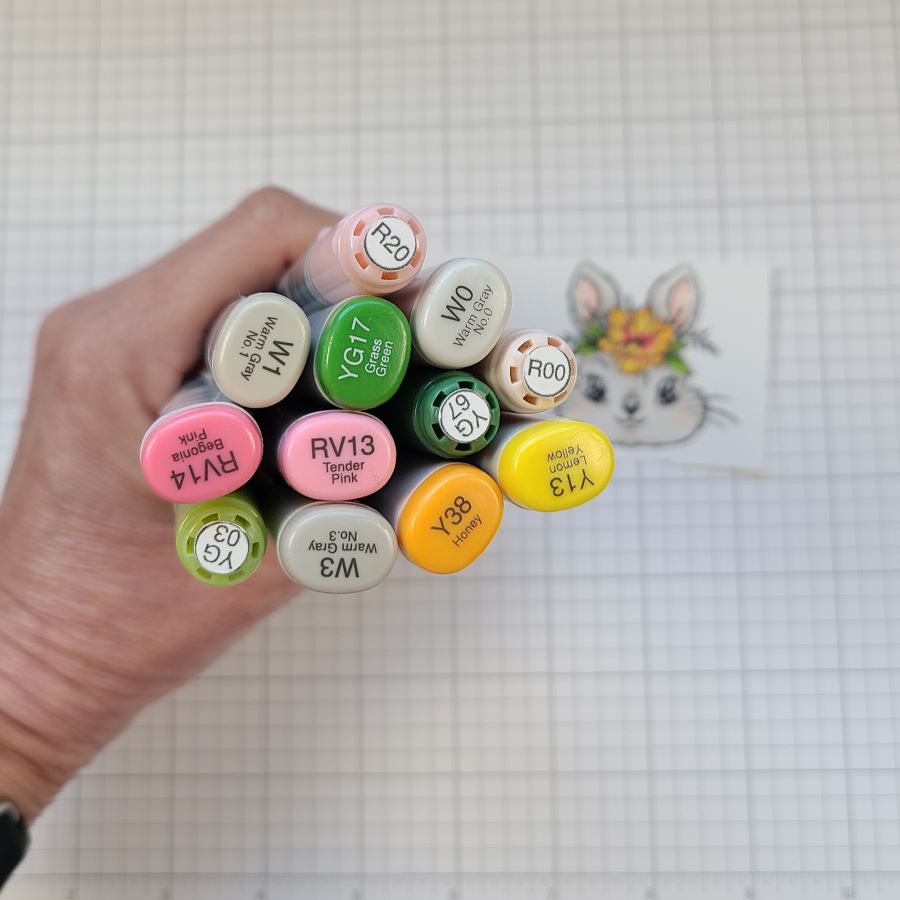
Now for my favorite part, Copic coloring. It’s really where I’m most comfortable. I usually pick three markers from each color family. Coloring light, medium, dark then back to medium, finishing back off with light. That’s just my preference, but there’s no wrong way. I used a total of 15 different colors. I’ve listed them in the photo

My card was finally coming together. I chose the Love and Hugs sentiment stamp from the set and an “&” diecut from my stash. I thought it fit perfectly in the space between the floral clusters.

I cut my card base at 7 x 8½, and scored it at 3½ and glued down the colored panel.

Sometimes, my cards don’t always turn out the way I see them in my head. This card didn’t look finished. So I added the scalloped border from Honey Bee stamps Slimline Sentiment: Eyelet and Iuile No.5 watercolor to the black dots.

Super happy with the finished card. Hope you like it too.

If you have any questions about any of the techniques I used on this card, leave me a comment and I’ll do my best to answer them for you.

Until next time…..

❤ - Jackie