
Hello and happy Friday friends. Jackie here and I’m excited to show you this slimline card I made using Hugs stamp set.
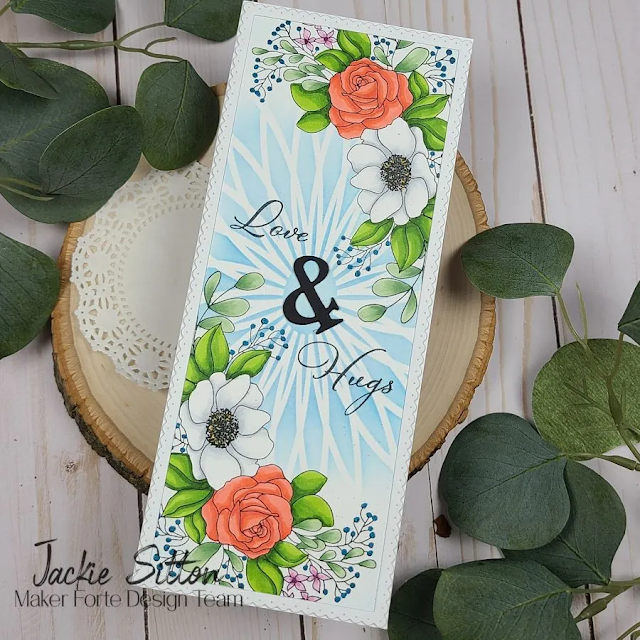
I started out by cutting down a sheet of Hammermill cover paper to 3½ x 8½. I wanted the stamp image to hang off the edge a little, so I used my Misti and inked up the flowers with Color Hive Remarkable Ink Pad in black Then I flipped the panel and stamped it again. If the paper hangs off the edge of the Misti a bit, it’s okay, it’ll still stamp perfectly

I knew that I wanted to add some color with a stencil, so while the stamp was still in my Misti, I stamped the flowers two more times on full stick Post-It note sheets. I fussy cut them out and carefully placed them over the flowers.
I then taped down the Glass Ceiling stencil and very carefully ink blended using Neon Lights.

Now for my favorite part, Copic coloring. It’s really where I’m most comfortable. I usually pick three markers from each color family. Coloring light, medium, dark then back to medium, finishing back off with light. That’s just my preference, but there’s no wrong way. I used a total of 15 different colors. I’ve listed them in the photo

My card was finally coming together. I chose the Love and Hugs sentiment stamp from the set and an “&” diecut from my stash. I thought it fit perfectly in the space between the floral clusters.
I cut my card base at 7 x 8½, and scored it at 3½ and glued down the colored panel.
Sometimes, my cards don’t always turn out the way I see them in my head. This card didn’t look finished. So I added the scalloped border from Honey Bee stamps Slimline Sentiment: Eyelet and Iuile No.5 watercolor to the black dots.
Super happy with the finished card. Hope you like it too.
If you have any questions about any of the techniques I used on this card, leave me a comment and I’ll do my best to answer them for you.
Until next time…..
❤ - Jackie
